

The fake hubby and I just looked at each other when it was put together (but not stained) and said – wow – did we just built a boat! We did!!!! Yeah!
Why?– well it is a short, long story…. So let’s start from the beginning.
Now that the whole front ‘yard’ is a big MULCHED garden, the plan is to move eggplant, tomatoes.. the entire actual veggie garden in the ‘back’ to the front for 2021. HOWEVER how does one plant carrots and beets and …. in mulch? I decided I would need a raised garden planter, and I just don’t like using several ‘barrels’ and the wheel barrow I bought to be a planter for $10 won’t be big enough for it all.
So I called on my friend, Pinterest, to help with some ideas. I wasn’t seeing much, but since this was around the same time as the good ‘ol pond research… I had seen several boats above ground being used as ponds. Hmmmm… so my next friend Facebook MarketPlace place, your turn! But all the sail or row boats were fairly expensive and BIG. I don’t need a 14 foot garden! I would be happy with 6 foot, but absolutely no more than 10 feet so its not all encompassing of my new yard. Frustrated I went back to Pinterest and with a DIY Boat planter ish search, found DIY boat designs… and eventually found some ‘one sheet plywood mini boat’ designs…
Hunny!!!!!!!
Can we built a boat!??!!!??? PPPPLLEEEEAAAAASSSEEEEEE these dudes made one in a few hours and outta one sheet of plywood…
The fake hubby is always up for an adventure, thankfully!! We looked at two designs really, because I wanted the smaller ‘one sheet plywood boat’ but with a flat butt like a row boat where the front is pointed too. The one sheet ones were either more like a floating barge with both the front and back flat and VERY low or more like a canoe. We would need then 1 and half pieces of plywood so we had to buy 2 (we choose Birch and got ¼ inch thick from Home Depot) (plywood is an 8 foot by 4 foot piece) and two 2×4’s.
First the fake hubby cut one of the birch plywood pieces in half lengthwise – so we would have two 2x8ft sections. Then he cut one side at an angle to make the top still the full 8 foot length but the bottom was a little more than 7.5 feet long.
(I drew ya’ll this FANTASTIC picture)
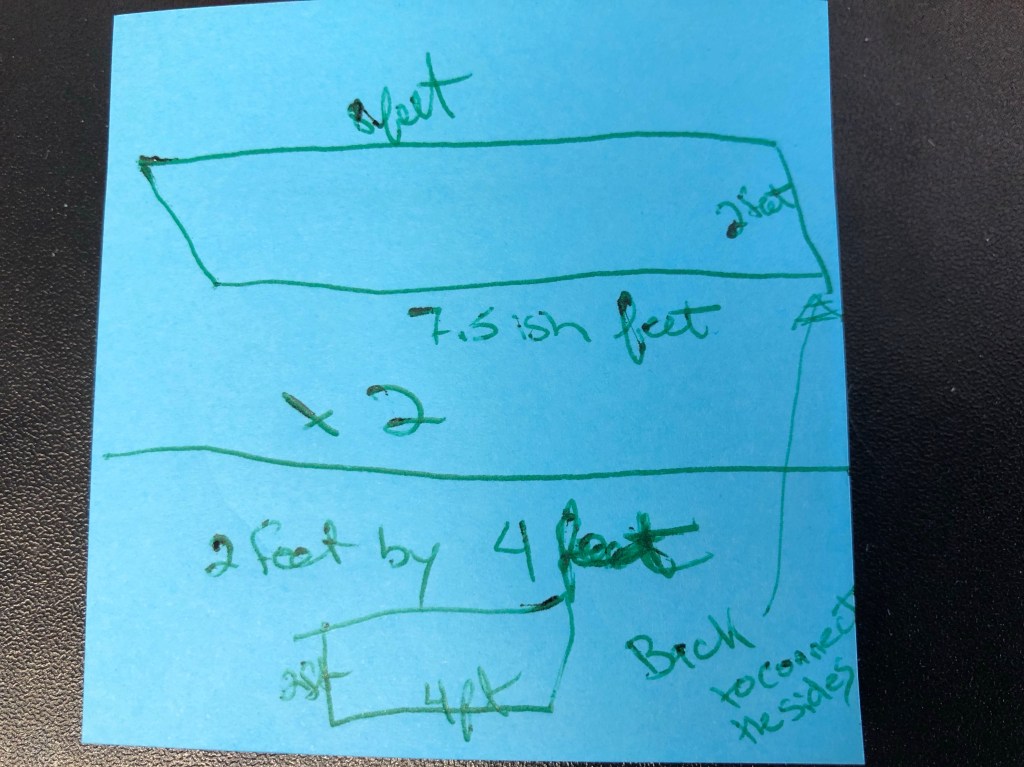
Then he made one cut out of the other piece of plywood so we would have a 2ft fall by the 4 feet across section. We are now left with a 6 foot by 4 foot piece leftover…
Now that we have our frame pieces it was time to put them together. The fake hubby cut one the 2×4’s into 2×2’s and then made them 2 feet tall and 4 feet tall… this framed the butt of the boat and would allow support and something to nail the butt anAd sides into to keep them together. We decided to use a nail gun and glue to be ‘safe’ and help prevent any areas from coming loosing or bubbling up…
Once we had this done, yours truly moved the boat so we could work on the front… but guess what… a piece of plywood is 4 feet wide… our boat… is 4 feet wide… and it FELL TO THE GROUND off of the plywood we were using as a table on the saw horses… and it BROKE APART!
Fake Hubby has the patience of a saint, because all I got was a ‘look’, and then off he went to go get screws and more tools. We (he, as I was afraid to touch it at this point) fixed it, and not only fixed it, but made it 10x sturdier than it was before. Of course now that my wits are back I feel the need to say “well if it could not handle a little tumble how do you think it would have held all the dirt!!!” The nails were easier to not be seen vs the screws we filled in with some wood something or another so they can’t be as seen… more work to cover them up, but much better in the long run.

Next up was cutting another 2×4 down for top and bottom supports to push out the sides of the boat. I am sure you have seen boats are fatter in the middle…
And then we cheated, since well, this is a planter, and we used a 2×4 section to connect the font. There is a gap, but we made the board an inch or two lower so once its covered with dirt it won’t matter.
And yes after we were prepping and even purchased a 3rd plywood piece, we also decided there was no point in making a bottom to the boat. I was concerned the bottom would rot faster and how to stain/seal and…. and…. we asked each other why it needed a bottom.
This was then our boat!!!

Staining the dang thing took longer then framing it, believe it or not. But the fake hubby is very detailed in these projects and we HAD to stain it with two coats. I did the all inside both 1st and 2nd coats, and most of the 2nd coats on the outside of the boat, but as he was quite particular, he did the other first coats of stain. He did however have to do both the 1st and 2nd of the outside of the butt of the boat, since it was standing upright I didn’t have access to that in our screen porch while staining.

FINISHED boat & with dirt! We had dirt from the Patio (see post on 77 bags of gravel!!) we saved, and then a later project was the pond and as we are digging that we are putting the dirt into the boat too!
What do you think?

End of August update: We hear cyclist, and walkers, and runners hey look a boat, that is cool, wow nice… and even have had some walkers/neighbors ask how we made it as they would like one. 😊 So there KO! (who said maybe he’d like it after it was painted, when it was stained and filled with dirt and… DONE lol). My favorite running buddy, but boy does he like to pull my chain sometimes.

Beautiful- great job!!
LikeLike